The Playbook should be used alongside the other guidance available through the Gateway Community site.
Downloadable PDF version:
Data custodian playbook v1.0.pdf (980.3 KB)
- Introduction
- Vision
- Information held on the Gateway
- Accessible and discoverable data
- Collections
- Data access requests
- 5 safes DAR form authorisation workflow
Introduction
Fast tracking innovation in health data
At HDR UK we passionately believe that every health and care interaction and research endeavour will be enhanced by access to large scale data and advanced analytics. Challenges to human health and health system sustainability are increasing globally. By making health data available to researchers and innovators we can better understand diseases and discover ways to prevent, treat and cure them.
The UK has some of the richest health data and unique research capabilities in the world, making it possible to make national-scale improvements to health and care. However, it is not always easy for researchers and innovators to discover the data that is available to support their research/work and to then apply for that data. This not only restricts innovation, but also results in a lot of irrelevant inquiries, and therefore wasted time, to already stretched data custodians.
We built the Innovation Gateway (the ‘Gateway’) to address these issues, making it easier for people to find the data to support their work and to simplify and streamline the process of requesting access requests to data for both custodians and researchers. All with the aim of accelerating research.
The Gateway - Innovation Gateway self-directed tour
The Gateway is a web portal providing a common entry point to discover and request access to UK health datasets for research and innovation. It holds detailed information about the datasets held by members of the UK Health Data Research Alliance, such as a description, size of the population, and the legal basis for access. It does not, however, hold or store any datasets, patient or health data.
Innovators can search for research projects, publications, training courses and health data tools, such as those related to COVID-19. Researchers can create and collaborate on projects, interact with data custodians, request access to datasets, and connect to other researchers via the community forum.
The information provided about the datasets is supplied by the relevant data controller and is continually updated.
The vision
The Vision for the Gateway is to be the primary go-to resource for:
- Discovering data, tools, best practice and collective knowledge and experience related to accessing resources to further health research.
- Posting research papers, datasets, tools and sharing learning and other resources knowing that the Gateway community will enable it to reach the broadest set of interested parties.
It contains metadata for over 500 datasets (and growing) that are discoverable using the Gateway’s easy-to-use interface and as its popularity grows so will the content.
The Gateway facilitates discovery and understanding of available datasets
As a Data Custodian, making your data discoverable through the Gateway provides the single simplest action you can take to:
-
help your data reach a significant and growing community of researchers and innovators from across academia and industry;
-
list your data alongside other resources (datasets, papers and tools) enabling innovators and researchers to identify novel linkages between datasets to support their research;
-
help you manage access requests to use your data through a single electronic interface and streamlined process.
This third point is significant, especially if you currently operate a paper-based Data Access Request (DAR) process which are typically onerous to operate and problematic to maintain. The Gateway provides a standardised, electronic Data Access Request (DAR) process (based on the 5 safes model from the Office for National Statistics) for innovators and researchers to request access to your data from you - the data custodian - and for you to review and approve/reject the request. By removing the need for paper processes, the Gateway provides supportive functionality to both data requesters and custodians by enabling:
-
secure communications between requestor and data custodian in advance of submitting a DAR;
-
customisable DAR form for the Data Custodian’s organisation based on a bank of over 100 pre-defined questions.
-
researchers to work together to complete a DAR through the use of embedded collaboration tools;
-
the ability for both custodians and requesters to manage and monitor DARs.
The information held in the Gateway
The Gateway does not hold a copy of Data Custodian data. Instead, it stores summary information used to describe each of the datasets that the Data Custodian holds. This is commonly known as Metadata and contains information such as: where the dataset has come from, a description of the dataset, the time-period, and the geographical areas the dataset covers.
This metadata is helpful for a researcher to understand whether a dataset will be of use to them without them having to see the data itself. Obviously, the more metadata that is provided about each dataset and the more accurate it is, the easier it is for the researcher or innovator to decide whether it is helpful for their work. This metadata also allows them to check they are eligible for access before making a request from the Data Custodian. This helps to reduce the number of invalid requests that custodians have to handle.
Each dataset entry on the Gateway has its available metadata described under the following headings - (Video tutorial: Viewing dataset details):
-
Summary and metadata quality score
The top of each entry provides a summary banner containing the name of the dataset, its publisher/custodian, how many times the entry has been viewed and a metadata quality score.
As described earlier, higher quality metadata makes it easier for users to decide if a particular dataset is of interest to them. To help Data Custodians and users to easily see the quality of a dataset’s metadata, a metadata richness score is calculated for each dataset record on the gateway and displayed on the gateway as Gold, Silver, Bronze or Not rated.
Metadata quality is calculated across four categories:
-
Completeness Percent
-
Weighted Completeness Percent
-
Error Percent
-
Weighted Error Percent
Together they produce a Weighted Quality Score and from that a quality rating is applied based on the table below
| Weighted)/Quality Score | Rating |
|---|---|
| < 66 | Not rated |
| >66 & <= 76 | Bronze |
| - >76 & <=86 | Silver |
| >86 | Gold |
| Platinum |
More information on how the scores are calculated is provided at the following link https://github.com/HDRUK/datasets/tree/master/reports#hdr-uk-data-documentation-scores
Below this summary banner are a number of tabs providing additional information about the dataset. These are described below.
-
About
This tab provides the high level overview of the available dataset broken down as follows:
-
Abstract
-
Description
-
Details: Latest release date; Publishing frequency; and Resource creator
-
Coverage: Time period covered; Any time lag in the dataset; Geographical Coverage; Typical age range of participants in the dataset; Availability of physical samples in the dataset; Any follow-up period for patients in the dataset; Any pathway represented in the dataset.
-
Formats and standards: A list of semantic annotations used within the dataset; Any standardised data models used; Language of the dataset; Format of the dataset e.g. csv
-
Provenance: Purpose for which the dataset was collected; Whether derived datasets are available and if so the type or derivation used.
-
Data access request: Jurisdiction; Data controller; and Data Processor, if relevant
-
Related resources: Any keystone paper associated with the dataset; any active projects using the dataset; and any tools or models that have been created for the dataset
-
Linked datasets: Any datasets linked to this dataset
-
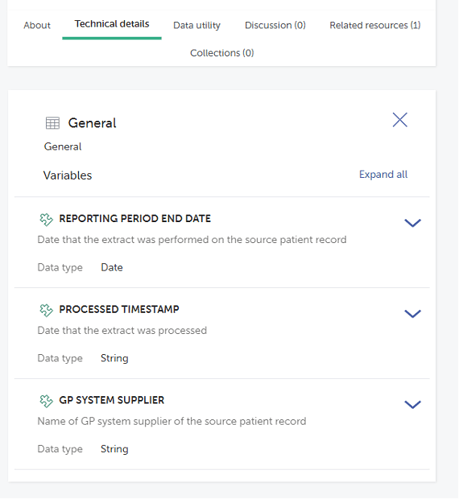
Technical details
Technical metadata provides information on the technical properties of the dataset file associated with the data model including for example, field name, data types. An example is provided in the image below.
-
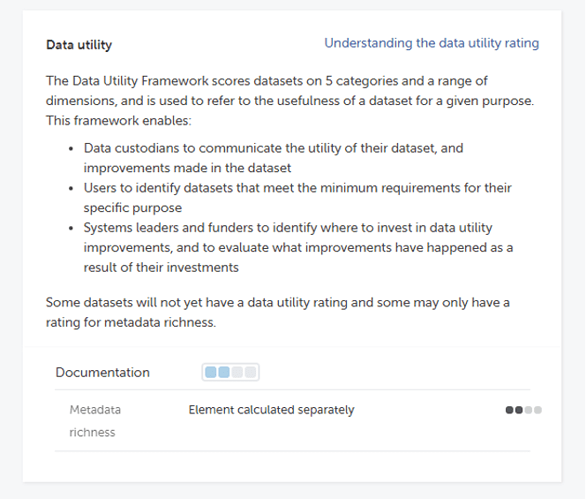
Data utility framework
The Data Utility Framework scores datasets on five categories and a range of dimensions and is used to refer to the usefulness of a dataset for a given purpose. The image below explains data utility in more detail.
More detail on Data Utility Evaluation is provided at the following link: https://www.hdruk.ac.uk/help-with-your-data/ways-to-improve-data-quality/data-utility-evaluation/
Data custodian journey and user journey
Now that we have explained the metadata that is stored on the Gateway, it is helpful to set out the high-level user journeys undertaken by researchers and custodians as part of the Innovation Gateway.
Making data discoverable and accessible via the Gateway
Creating an Account
To begin onboarding metadata to the Gateway, you will need to create an account on the Gateway, and be added as a member of a team for your institution.
More detailed guidance on creating an account on the Gateway can be found here:
📺 How to manage your account
More detailed guidance on how to create and be added to a team can be found here:
Creating and managing a team
Adding Datasets to the Gateway
When you have created an account on the gateway, and have been added as a team member for your organisation, you will then be able add new datasets to the gateway. You can do this from the datasets tab on your account page. From there you will be guided through the process for onboarding the relevant descriptive and structural metadata for your dataset.
More detailed guidance on adding new datasets to the Gateway can be found here:
Adding datasets to the Gateway &
 How to add a dataset to the Gateway
Approval Process
Once you have onboarded the metadata for your dataset, you can then submit your dataset for approval to the HDR UK review process. The outcome of the review will be communicated to you by email, with notes on the decision. In the case of a rejection, this will be the reason for its rejection. If your dataset is rejected, you can upload a new version of the datasets from the Datasets tab on your account page.
More detailed guidance on the dataset review process can be found here:
Submitting Datasets for review and receiving a decision &
 How to submit your dataset for review
Managing Datasets on the Gateway
On the datasets tab, you can view and edit your datasets that either live or in draft. You can also check the status of your datasets, the number of sections of the onboarding process that have been completed, and their progress through the review process if applicable.
More detailed guidance on managing datasets on the Gateway can be found here:
Managing Datasets on the Gateway &
 How to manage your datasets on the Gateway
Versioning and Archiving Datasets
You can create new versions of datasets from the Datasets tab in your account page. This can be useful for updating datasets that are live on the Gateway, or for resubmitting Datasets that have been rejected or archived. In the onboarding process, you can also navigate and view different versions of of the Datasets here.
You can archive a dataset from the action bar in the onboarding page. Archived datasets will not appear in gateway searches, but will still be accessible using a direct link.
More detailed guidance on versioning and archiving datasets on the Gateway can be found here:
Versioning and archiving datasets &
 How to version and archive datasets
Grouping your datasets for easy discovery with collections - Video tutorial: Collections
Why create a collection?
Collections are used to categorise related resources in one single space. Anyone on the Gateway can create collections and share them with other researchers. Collections can be populated with tools, projects, papers, people, courses and datasets and can be created by any user on the Gateway. They can also revolve around a certain disease - such as COVID-19, a data research hub - such as INSIGHT or any other grouping you require.
On the homepage of the Gateway you will find the featured collections. These have been selected by or suggested to HDRUK to be featured, in order to increase their visibility. You may submit your own collections to be featured via a feature request ticket. But by default, collections are private and only you can see collections you created. If you would like to share one of your collections with a collaborator, you can simply send them a link to the collection. In addition, if you think that your collection would benefit others by being published on the Gateway home page then contact a member of the Gateway team with your reasons and they will consider the request.
Collection categories
Collection categories are another feature of the Innovation Gateway allowing you to group collections by theme. For instance, in the National Core Studies category you can find 6 collections that relate to one of the National Core Studies. You can view all featured collections and categories with the ‘Explore all’ button, or through the ‘view all featured collections’ button via the Collections tab at the top of the homepage.
How to create a collection
-
To create your own collection, you first need to register onto the Gateway and create an account.
-
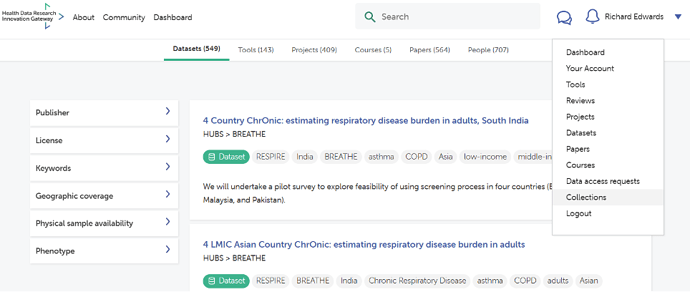
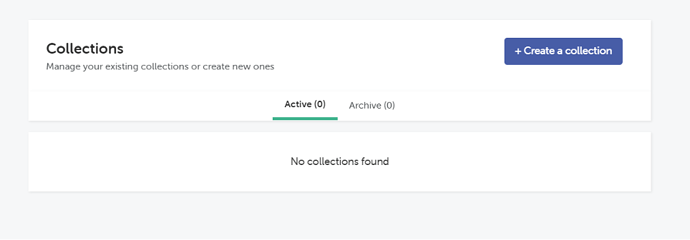
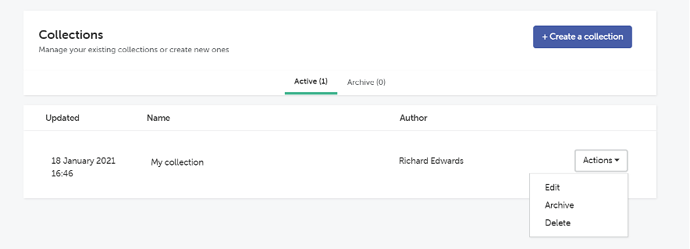
Sign in, and navigate to your account via the top right hand corner. You will see the collections tab in the left hand navigation on your account. Here you will be able to manage your existing collections or create a new one. You can see which collections are active and which have been archived.
- To create a new collection click the ‘create a collection’ button.
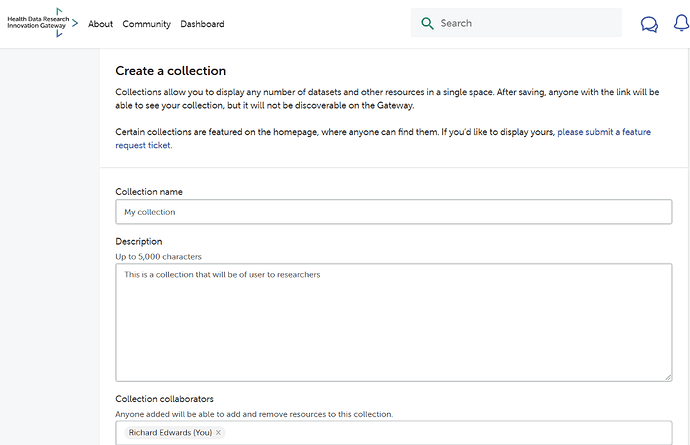
You will be presented with the Collection creation form.
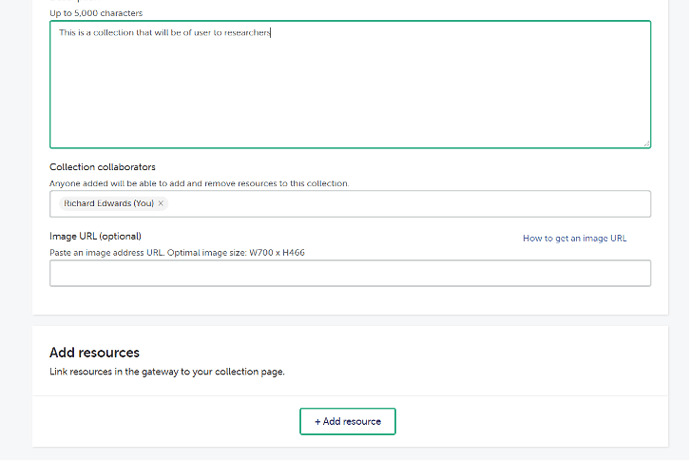
- Enter the name for your collection, provide a description and add collaborators. You can also add an image using an image URL. Note that collaborators need to also have a Gateway account and will be able to add and remove resources to the collection.
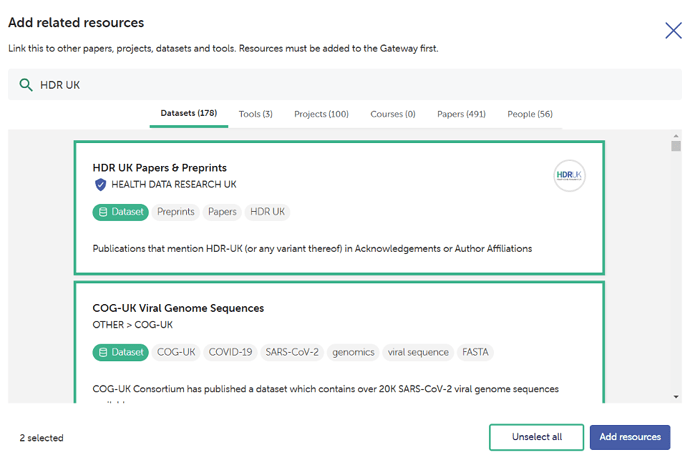
- You now need to add resources to your collection. First click the + Add resource button to open a search modal.
Now search for the resources in the same way that you do in the main search page. Results are divided into categories like the main search page - datasets, tools, projects, courses, papers and people.
Select as many as you like from all the different categories. The number of resources you’ve selected is shown on the bottom left. You can unselect resources individually by clicking on them again. Alternatively, if you want to unselect all of the resources you can use the Unselect all button. Once you are happy with the list of resources from your search click Add resources. You will be returned to the collection screen with your selected resources added.
-
You can repeat the process above to add more resources to your collection until you are happy you have included all the items you require.
-
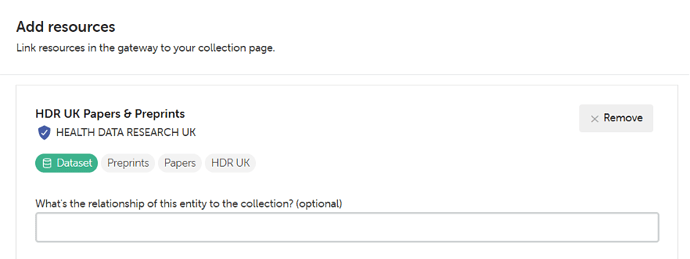
You can remove any resources you no longer want to include in the collection by clicking the Remove button in the top right of each resource summary.
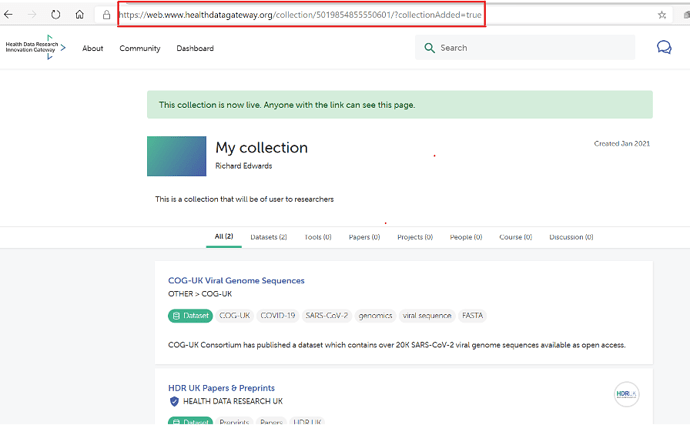
- When you are finished, you can ‘save’ the collection using the button at the bottom of the page. As shown by the success banner on your collection page, you can share this collection with anyone by selecting the entire address URL, copying and pasting to the appropriate person. If you want this collection to be featured on the homepage you would do so via a feature request ticket.
Editing a collection
- To edit a collection you first need to access the collections dashboard. You do this using the account drop-down at the top right of the screen. This is shown in the earlier images.
- Active collections are shown in the Active tab. From here you can use the Actions menu to edit, archive or delete it. To edit, click edit and make any required changes the same way that you did when creating the collection. Once you have finished editing you save it the same way you did previously.
Archiving a collection
Archiving a collection removes it from your active collection tab but doesn’t delete it permanently. You can always unarchive a collection if you decide to in the future.
- To archive a collection you first need to access the collections dashboard. You do this using the account drop-down at the top right of the screen. This is shown in the earlier images.
- Active collections are shown in the active tab. From here you can use the Actions menu to edit, archive or delete it. This is shown in the earlier images. To Archive a collection, click Archive. You will be asked to confirm your decision. Click yes and your collection will be moved into the Archive tab.
- You can unarchive a collection by navigating to the Archive tab and using the Actions menu to select Unarchive. You will be asked to confirm your decision. Click yes and your collection will be returned to the Active tab.
Deleting a collection
Deleting a collection removes it completely from your account. Once deleted a collection cannot be recovered.
- To delete a collection you first need to access the collections dashboard. You do this using the account drop-down at the top right of the screen. This is shown in the earlier images.
- Active collections are shown in the Active tab, archived collections are shown in the Archive tab. You can delete a collection from either tab. From here you can use the Actions menu to edit, archive or delete it. To Delete a collection, click Delete. This is shown in the earlier images. You will be asked to confirm your decision. Click yes and your collection will be permanently deleted from the directory.
Future plans
In the future - collections will be searchable on the Gateway. Because of this you will be able to make collections private or public depending on who you want to view your collections.
Why and how researchers and innovators make data access requests
The Gateway contains over 500 datasets (and growing) that are discoverable using the Gateway’s easy-to-use interface. And a primary objective of the Gateway is to simplify, streamline and therefore reduce the time it takes users to submit, and data custodians to review and make a decision on user requests for access to data.
Now that your data is discoverable, innovators and researchers want to do more than just find it. Where it will support their work, they will want to request access to it. This is where the Data Access Request (DAR) functionality of the Gateway comes into play.
A DAR is the process by which a user can make contact with a data custodian to request access to their data. Their request is supported by additional information about the work they want to use the data to support.
How applicants request access - Video tutorial: How to submit a data access request
Before applicants can request access, they first need to find a dataset that suits their research needs. They will also need a Gateway user account and must be logged in to the make an application.
-
Applicants will see a Request access button if you are a custodian using the short enquiry form
-
Applicants will see a How to request access button if you are a custodian using the new 5 safes application form.
-
Applicants are encouraged to send a message to the custodian before starting the application process.
Data Access Request (DAR) Forms
Depending on the custodian, users will either be able to send a data request enquiry to the custodian (Short Form Data Access Request) or, where a Data Custodian has implemented a 5 safes DAR Form on the Gateway (Long form Data Access Request), the entire DAR process can be conducted electronically through the Gateway itself. The 5 safes process offers other supportive functionality to both data requesters and custodians by enabling secure communications between requestor and data custodian in advance of submitting a DAR; powerful collaboration tools to allow collaborators to work together to complete the DAR, and the ability to monitor DAR progress.
More information on the 5 safes process is set out below and if you would like to put your Data Custodian forward for onboarding to 5 Safes or would just like more information, please make contact through Paola Quattroni at HDR UK.
Short form Data Access Requests
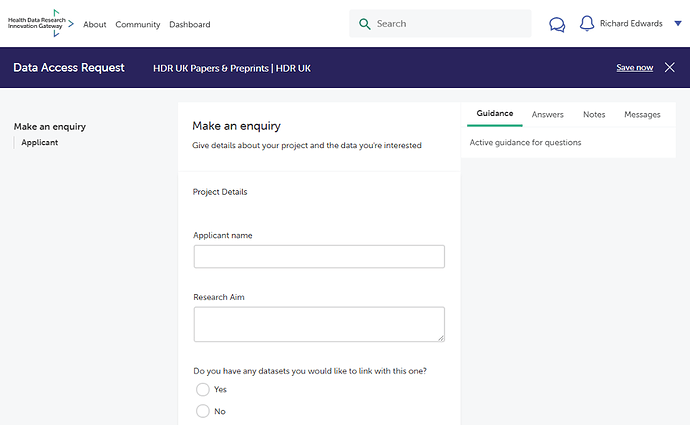
Unless a Data Custodian has been onboarded to the 5 safes DAR process, all data requests will be handled through a simple enquiry form. An example of this is set out in the figure below.
The enquiry screen captures key information about the user’s project and the data that they are interested in. It includes:
-
Applicant name
-
Research aim
-
Whether there is a requirement to link datasets
-
Which parts of the dataset the user is interested in
-
Proposed project start date
-
ICO number
-
Research benefits (optional)
-
Ethical processing evidence (optional)
-
Contact telephone number (optional)
Once the user has completed and submitted the enquiry form, the content of this will be emailed to the data custodian for consideration. For these types of enquiry there are no other steps that need to be undertaken on the Gateway.
Long form Data Access Requests
Where a Data Custodian has onboarded to the 5 safes DAR process, a much more advanced and fully featured set of DAR functionality is available to the custodian. In the majority of cases, this allows the custodian to process the entire DAR electronically through the Gateway, helping avoid onerous and time consuming fragmented and/or paper based processes.
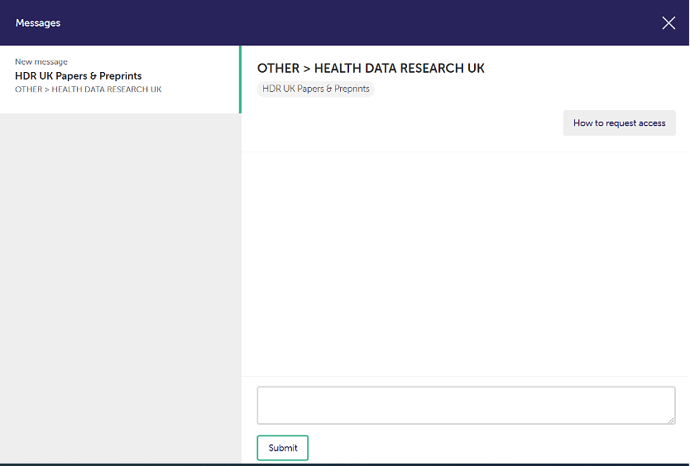
As illustrated in the images above and below, where a 5 safes DAR has been implemented, should they have any questions, users have the ability to message the custodian prior to submitting the application. This messaging function exists entirely within the Gateway application, is specific to each data request, and therefore is much simpler for custodians to administer compared to other tools such as email.
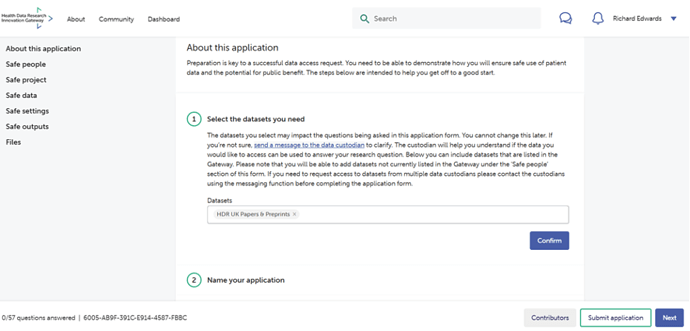
Once a user decides to submit a 5 safes DAR, they are required to select one or more datasets that they would like access to. Working with other contributors if relevant, the user(s) are then required to answer questions across each of the 5 domains of Safe people, Safe project, Safe data, Safe settings, and Safe outputs. This is illustrated in the image below.
Once the user(s) has completed and submitted the application the custodian is then able to review the application, query aspects of it and/or ask for further information and then decide on whether to approve the application (with or without conditions) or reject it. All of this can be done through the Gateway.
If you would like to put your Data Custodian forward for onboarding to 5 Safes or would just like more information, please make contact through Paola Quattroni.
5 safes DAR form authorisation workflow
How Data Custodians manage and process data access requests
Creating a team and adding members - Video tutorial: Setting up a team, creating workflows and reviewing an application
A team on the Gateway is a group of associated members from a data custodian. Teams are used on the gateway by data custodians to manage datasets and data access request applications from users on the Gateway.
To create a new team, please get in touch with HDR UK via email. We are working on a new feature which will allow you to do this yourself in the future.
To add new members, go to your account, and switch between your name and your team’s name on the top left hand corner.
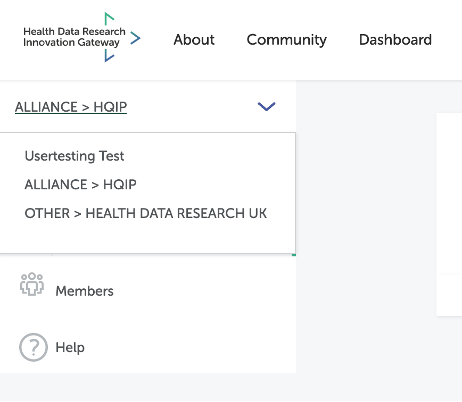
Members can be added to your team, so long as they are members of the Gateway. There are two types of members who have different permissions.
-
Managers can manage members, create and assign workflows, review applications that are assigned to them and make the final decision on data access request applications.
-
Reviewers can only review applications that are assigned to them.
You can add team members via the Members section of your dashboard. To remove or change the role of a member, please contact HDR UK via email.
Customise your “How to request access” information
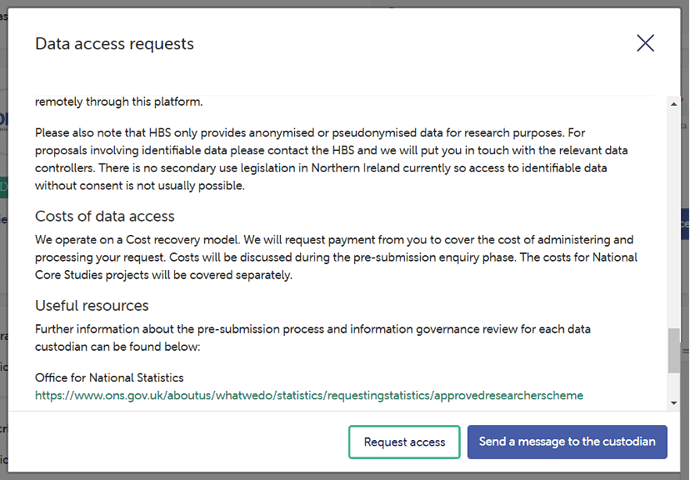
This information will appear once the user clicks the How to Request Access button on one of your datasets. Each custodian can customise the text that appears for them. The same information will be shown for all datasets from the same custodian.
The modal will be displayed to all users at the beginning of their access journey. To ensure that they are prepared for the process, include all necessary information such as; what to do before they submit an application, when data can be released, the cost and other useful resources.
We are working on a new feature which will allow you to change this text yourself. For now, please get in touch with HDR UK via email to request any changes.
Customise your Data Access Request form
You can customise the form that applicants are required to fill in when requesting access to your datasets.
-
Select the questions you want on your form from our question bank. You can turn questions on/off, but not change the wording of a question.
-
Add custom guidance to each question. Guidance can contain links to pages or documents.
-
Add custom guidance on each page.
We are working on a new feature which will allow you to customise the form yourself. For now, please get in touch with HDR UK via email to request any changes.
If you need a question which is not on our question bank, get in touch. We are constantly reviewing the form and making improvements based on feedback form custodians and researchers.
Creating a Data Access Request workflow - Video tutorial: Setting up a team, creating and workflows and reviewing an application
Workflows can help data custodians manage the review process after an application is received. You can assign people on your team to review certain parts of the form, and send automatic notifications when it’s their turn to action.
Once a new application is submitted, managers will have the option to either make a decision (Approve, Reject) or assign a workflow. Workflows are optional, and won’t do anything until they are assigned to an application.
To create a new workflow, go to Data Access Requests > Workflows > +Add a new workflow
-
Create a phase and give it a name (i.e. Ethics). You can add as many phase as you like.
-
Assign reviewers (members of your team) to the phase and sections of the form to be reviewed (safe people, safe project)
-
Assign a deadline. Reviewers will receive a notification 3 days before the deadline.
-
Phase 2 will start after phase 1 and so on.
-
A phase will end when all reviewers have made a recommendation (issues found, no issues found).
-
Managers of a team will always have the ability to manually skip the workflow review of an application to the next phase, in case something goes wrong or a reviewer isn’t available.
You can have as many workflows as you like, and assign the appropriate workflow to an application after having reviewed its contents. For instance, you may have a Regular workflow and a Fast-track workflow, or a New application workflow vs a Extension workflow.
Reviewing and managing a 5 safes Data Access Request application - Video tutorial: Setting up a team, creating workflows and reviewing an application
Managers will receive an email notification whenever a new application is submitted. Managers can then start the review process, and make a decision: approve, approve with conditions or reject. Managers can also assign a workflow, which will send the application to others in their team for review.
